Overview
Django MongoDB Backend is a Django database backend that uses PyMongo to connect to MongoDB. This tutorial shows you how to create a Django app, connect to a MongoDB cluster hosted on MongoDB Atlas, and interact with data in your cluster.
Tip
MongoDB Atlas is a fully managed cloud database service that hosts your MongoDB deployments. You can create your own free (no credit card required) MongoDB Atlas deployment by following the steps in this guide.
Follow this tutorial to connect a sample Django application to a MongoDB Atlas deployment.
Download and Install
Complete the following steps to install Django MongoDB Backend and its dependencies in your development environment.
Install the dependencies.
Before installing Django MongoDB Backend, ensure you have Python 3.10 or later installed in your development environment.
Create a virtual environment.
Select the tab corresponding to your operating system and run the following commands to create and activate a virtual environment in which to install Django MongoDB Backend:
python -m venv venv source venv/bin/activate
python -m venv venv . venv\Scripts\activate
Tip
In the preceding commands, you might need to replace
python with the command that points to your Python
3.10+ interpreter.
Create a MongoDB Deployment
You can create a free tier MongoDB deployment on MongoDB Atlas to store and manage your data. MongoDB Atlas hosts and manages your MongoDB database in the cloud.
Create a free MongoDB deployment on Atlas.
Complete the Get Started with Atlas guide to set up a new Atlas account and a free tier MongoDB deployment. Ensure that you load sample data and add your IP address to the IP access list.
Create a Connection String
You can connect to your MongoDB deployment by providing a connection URI, also called a connection string, which instructs the driver on how to connect to a MongoDB deployment and how to behave while connected.
The connection string includes the hostname or IP address and port of your deployment, the authentication mechanism, user credentials when applicable, and connection options.
Find your MongoDB Atlas connection string.
To retrieve your connection string for the deployment that you created in the previous step, log into your Atlas account and navigate to the Clusters section and click the Connect button for your new deployment.

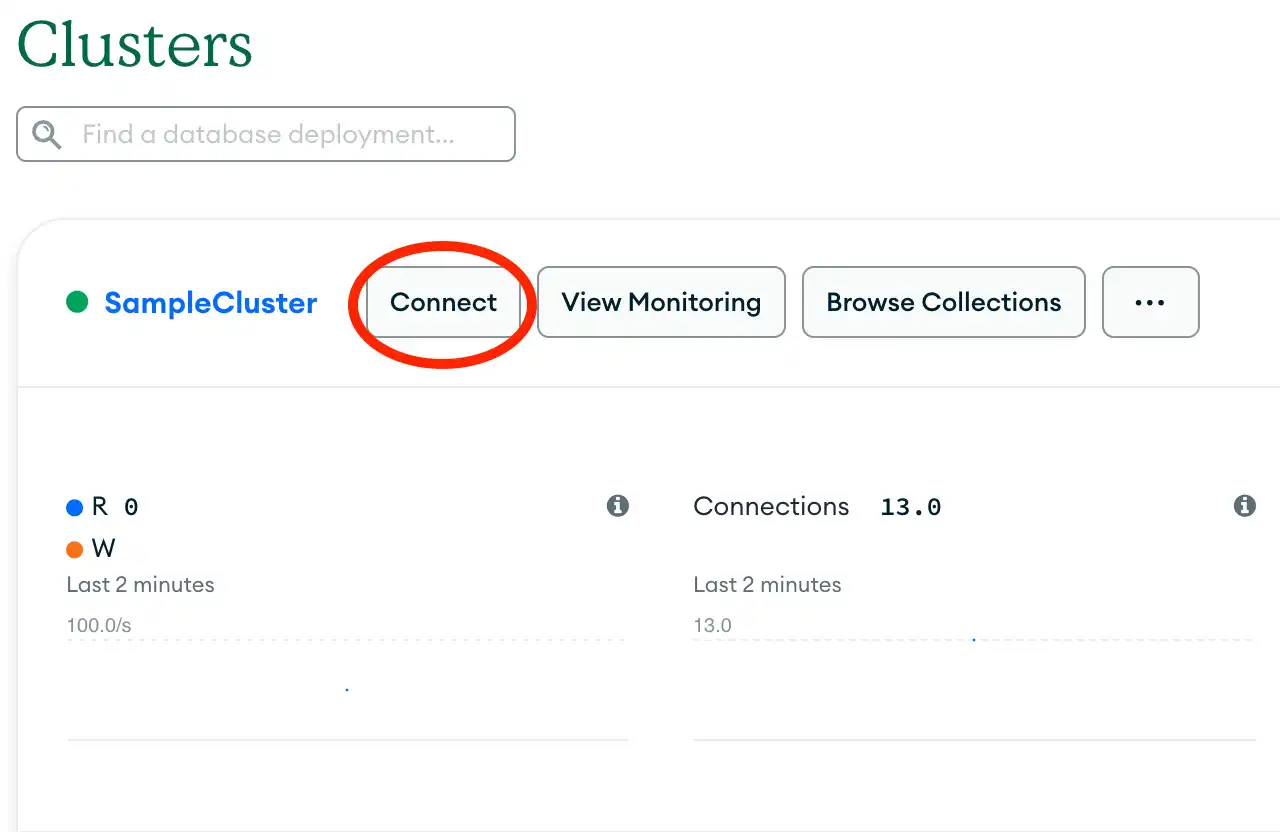
Proceed to the Connect your application section and select "Python" from the Driver selection menu and the version that best matches the version you installed from the Version selection menu.

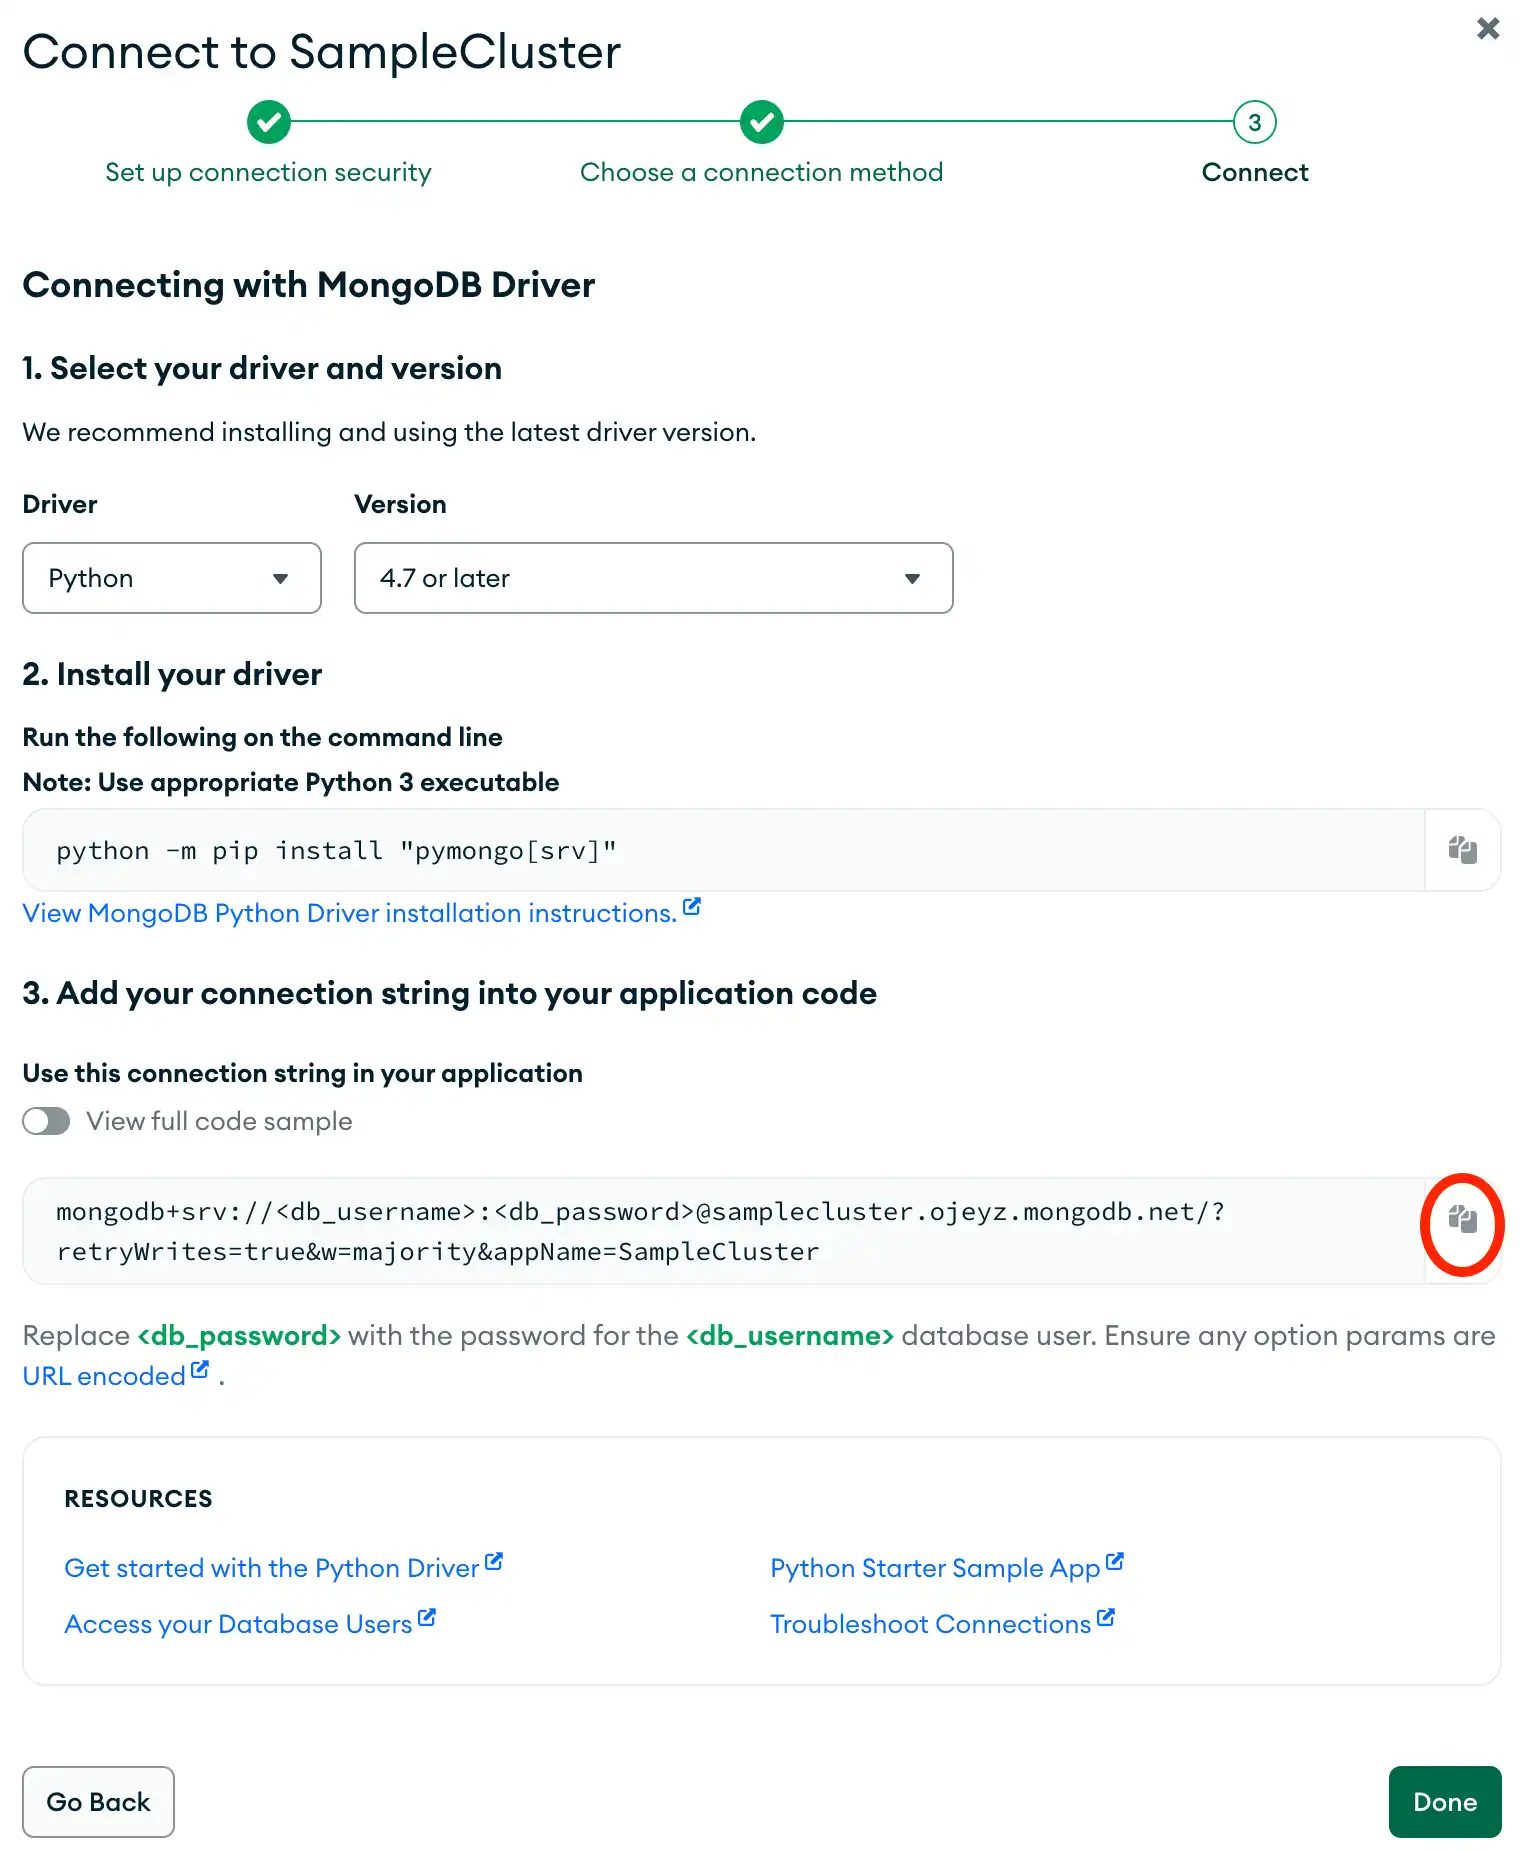
Edit your connection string credentials.
Paste your connection string into a file in your preferred text editor and save this file to a safe location for later use. Your connection string resembles the following example:
mongodb+srv://<db_username>:<db_password>@samplecluster.ojeyz.mongodb.net/?retryWrites=true&w=majority&appName=SampleCluster
Replace the <db_username> and <db_password> placeholders with
your database user's username and password.
Configure your MongoDB Connection
After installing Django MongoDB Backend and creating a MongoDB Atlas cluster, you can create a Django project that connects to MongoDB.
Create a Django project.
From your shell, run the following command to create a
new Django project called quickstart based on a custom template:
django-admin startproject quickstart --template https://github.com/mongodb-labs/django-mongodb-project/archive/refs/heads/6.0.x.zip
Note
Project Template
The django-mongodb-project template resembles the default Django project
template but makes the following changes:
Includes MongoDB-specific migrations
Modifies the
settings.pyfile to instruct Django to use anObjectIdvalue as each model's primary key
After running this command, your quickstart project has
the following file structure:
quickstart/ manage.py mongo_migrations/ __init__.py contenttypes/ auth/ admin/ quickstart/ __init__.py apps.py settings.py urls.py asgi.py wsgi.py
Update your database settings.
Open your settings.py file and navigate to the DATABASES setting.
Replace this setting with the following code:
DATABASES = { "default": { "ENGINE": "django_mongodb_backend", "HOST": "<connection string URI>", "NAME": "sample_mflix", }, }
Replace the <connection string URI> placeholder with the connection string
that you copied from the Create a Connection String
step of this Get Started guide.
This configures your Django app to connect to
your Atlas cluster and access the sample_mflix sample database.
Start the server.
To verify that you installed Django MongoDB Backend and correctly configured your project, run the following command from your project root:
python manage.py runserver
Then, visit http://127.0.0.1:8000/. This page displays a "Congratulations!" message and an image of a rocket.
Create an Application
In your quickstart project, you can create an application
that interacts with the Atlas sample database called sample_mflix.
This database contains a movies collection, which stores
information about movies. The database also contains a users
collection, which stores information about movie viewers who use
a streaming service.
To learn more about the sample_mflix database, see Sample Mflix Dataset in the Atlas documentation.
Create models for movie, award, and viewer data.
Open the models.py file in the sample_mflix directory and replace
its contents with the following code:
from django.db import models from django.conf import settings from django_mongodb_backend.fields import EmbeddedModelField, ArrayField from django_mongodb_backend.models import EmbeddedModel class Award(EmbeddedModel): wins = models.IntegerField(default=0) nominations = models.IntegerField(default=0) text = models.CharField(max_length=100) class Movie(models.Model): title = models.CharField(max_length=200) plot = models.TextField(blank=True) runtime = models.IntegerField(default=0) released = models.DateTimeField("release date", null=True, blank=True) awards = EmbeddedModelField(Award, null=True, blank=True) genres = ArrayField(models.CharField(max_length=100), null=True, blank=True) class Meta: db_table = "movies" managed = False def __str__(self): return self.title class Viewer(models.Model): name = models.CharField(max_length=100) email = models.CharField(max_length=200) class Meta: db_table = "users" managed = False def __str__(self): return self.name
The Movie model represents the sample_mflix.movies collection
and stores information about movies. This model contains an embedded
model field named awards, which stores an Award object. The
model also contains an array field named genres, which stores
a list of genres that describe the movie.
The Award model does not represent a separate collection. Instead, it
represents the embedded document values stored in the Movie model.
The Viewer model represents the sample_mflix.users collection
and stores account information for movie viewers.
Create views to display data.
Open the views.py file in your sample_mflix directory and replace
its contents with the following code:
from django.http import HttpResponse from django.shortcuts import render from .models import Movie, Viewer def index(request): return HttpResponse("Hello, world. You're at the application index.") def recent_movies(request): movies = Movie.objects.order_by("-released")[:5] return render(request, "recent_movies.html", {"movies": movies}) def viewers_list(request): viewers = Viewer.objects.order_by("name")[:10] return render(request, "viewers_list.html", {"viewers": viewers})
These views display a landing page message and information about your Movie
and Viewer models.
Configure URLs for your views.
Create a new file called urls.py file in your sample_mflix directory.
To map the views defined in the preceding step to URLs, paste the following
code into urls.py:
from django.urls import path from . import views urlpatterns = [ path("recent_movies/", views.recent_movies, name="recent_movies"), path("viewers_list/", views.viewers_list, name="viewers_list"), path("", views.index, name="index"), ]
Then, navigate to the quickstart/urls.py file and replace its contents with
the following code:
from django.contrib import admin from django.urls import include, path urlpatterns = [ path("admin/", admin.site.urls), path("", include("sample_mflix.urls")), ]
Create templates to format your data.
In your sample_mflix directory, create a subdirectory called
templates. Then, create a file called recent_movies.html
and paste the following code:
<!-- templates/recent_movies.html --> <!DOCTYPE html> <html lang="en"> <head> <meta charset="UTF-8"> <meta name="viewport" content="width=device-width, initial-scale=1.0"> <title>Recent Movies</title> </head> <body> <h1>Five Most Recent Movies</h1> <ul> {% for movie in movies %} <li> <strong>{{ movie.title }}</strong> (Released: {{ movie.released }}) </li> {% empty %} <li>No movies found.</li> {% endfor %} </ul> </body> </html>
This template formats the movie data requested by the recent_movies view.
Create another file in the sample_mflix/templates directory called
viewers_list.html and paste the following code:
<!-- templates/viewers_list.html --> <!DOCTYPE html> <html lang="en"> <head> <meta charset="UTF-8"> <meta name="viewport" content="width=device-width, initial-scale=1.0"> <title>Viewers List</title> </head> <body> <h1>Alphabetical Viewers List</h1> <table> <thead> <tr> <th>Name</th> <th>Email</th> </tr> </thead> <tbody> {% for viewer in viewers %} <tr> <td>{{ viewer.name }}</td> <td>{{ viewer.email }}</td> </tr> {% empty %} <tr> <td colspan="2">No viewer found.</td> </tr> {% endfor %} </tbody> </table> </body> </html>
This template formats the user data requested by the viewers_list view.
Include your app in your project.
Open the settings.py file in quickstart and edit your
INSTALLED_APPS setting to resemble the following code:
INSTALLED_APPS = [ 'sample_mflix.apps.SampleMflixConfig', 'quickstart.apps.MongoAdminConfig', 'quickstart.apps.MongoAuthConfig', 'quickstart.apps.MongoContentTypesConfig', 'django.contrib.sessions', 'django.contrib.messages', 'django.contrib.staticfiles', ]
Write Data to MongoDB
You can use your application's models to update documents
stored in the sample_mflix database. To update documents,
enter the Python interactive shell and call create, update,
and delete functions on your model objects.
Insert a Movie object into the database.
Run the following code to create an Movie object that
stores data about a movie titled "Minari", including
its awards in an Award object:
movie_awards = Award(wins=122, nominations=245, text="Won 1 Oscar") movie = Movie.objects.create( title="Minari", plot="A Korean-American family moves to an Arkansas farm in search of their own American Dream", runtime=217, released=timezone.make_aware(datetime(2020, 1, 26)), awards=movie_awards, genres=["Drama", "Comedy"] )
Insert a Viewer object into the database.
You can also use your Viewer model to insert documents into the
sample_mflix.users collection. Run the following code to create
a Viewer object that stores data about a movie viewer named "Abigail Carter":
viewer = Viewer.objects.create( name="Abigail Carter", email="abigail.carter@fakegmail.com" )
Render your new objects.
To ensure that you inserted a Movie object into the database,
visit the http://127.0.0.1:8000/recent_movies/ URL.
You can see a list of five movies in the sample_mflix.movies
database, with your new movie listed at the top.
Then, ensure that you inserted a Viewer object into the
database by visiting the http://127.0.0.1:8000/viewers_list/
URL. You can see a list of ten viewer names in the sample_mflix.users
database, with your new viewer listed at the top. Ensure that the
viewer named "Alliser Thorne", deleted in a previous step, does not appear
in this list.
Query MongoDB Data
You can import your models into the Python interactive shell
to read data from the sample_mflix database.
Query the users collection for a specified email.
Start a Python shell by running the following command:
python manage.py shell
Then, run the following code to query the
sample_mflix.users collection for a movie viewer whose email is
"jason_momoa@gameofthron.es":
from sample_mflix.models import Movie, Viewer Viewer.objects.filter(email="jason_momoa@gameofthron.es").first()
This code returns the name of the matching user:
<Viewer: Khal Drogo>
Query the movies collection for specified runtime values.
Run the following code to query the sample_mflix.movies
collection for movies that have a runtime value less than
10:
Movie.objects.filter(runtime__lt=10)
This code returns a truncated list of the matching movies:
<QuerySet [<Movie: Winsor McCay, the Famous Cartoonist of the N.Y. Herald and His Moving Comics>, <Movie: Steamboat Willie>, <Movie: Three Little Pigs>, <Movie: The Band Concert>, <Movie: Who Killed Cock Robin?>, <Movie: Dots>, <Movie: The Cat Concerto>, <Movie: Begone Dull Care>, <Movie: Mi adorado Juan>, <Movie: Neighbours>, <Movie: A Phantasy>, <Movie: Duck Amuck>, <Movie: Duck Dodgers in the 24èth Century>, <Movie: Blinkity Blank>, <Movie: One Froggy Evening>, <Movie: What's Opera, Doc?>, <Movie: Lines: Horizontal>, <Movie: Il fornaretto di Venezia>, <Movie: Dog Star Man: Part IV>, <Movie: Now>, '...(remaining elements truncated)...']>
Create an Admin Site
You can create a Django admin site to edit your application's data from a web interface. To learn more about the Django admin site and its features, see The Django admin site in the Django documentation.
Create an admin user.
Before creating an admin site, you must create a user who can log in to the site.
From your project's root directory, run the following command to create an admin user:
python manage.py createsuperuser
Then, your terminal prompts you for a username, email address, and password. For each prompt, enter the following information to create a user with the specified credentials and press "enter" after each entry:
Username: admin Email address: admin@example.com Password: <admin-password> Password (again): <admin-password>
Replace the <admin-password> placeholder with your user's password.
Enter the admin site.
Run the following code to start your server:
python manage.py runserver
Once your server is running, visit the http://127.0.0.1:8000/admin/ URL to see the admin site. This site displays the following login screen:

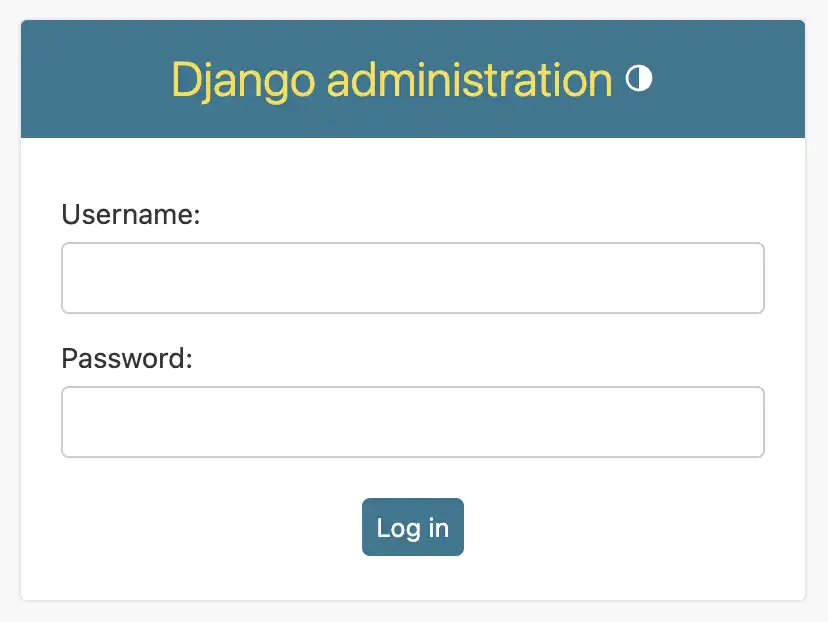
Enter the username and password created in the previous step to log in to the site.
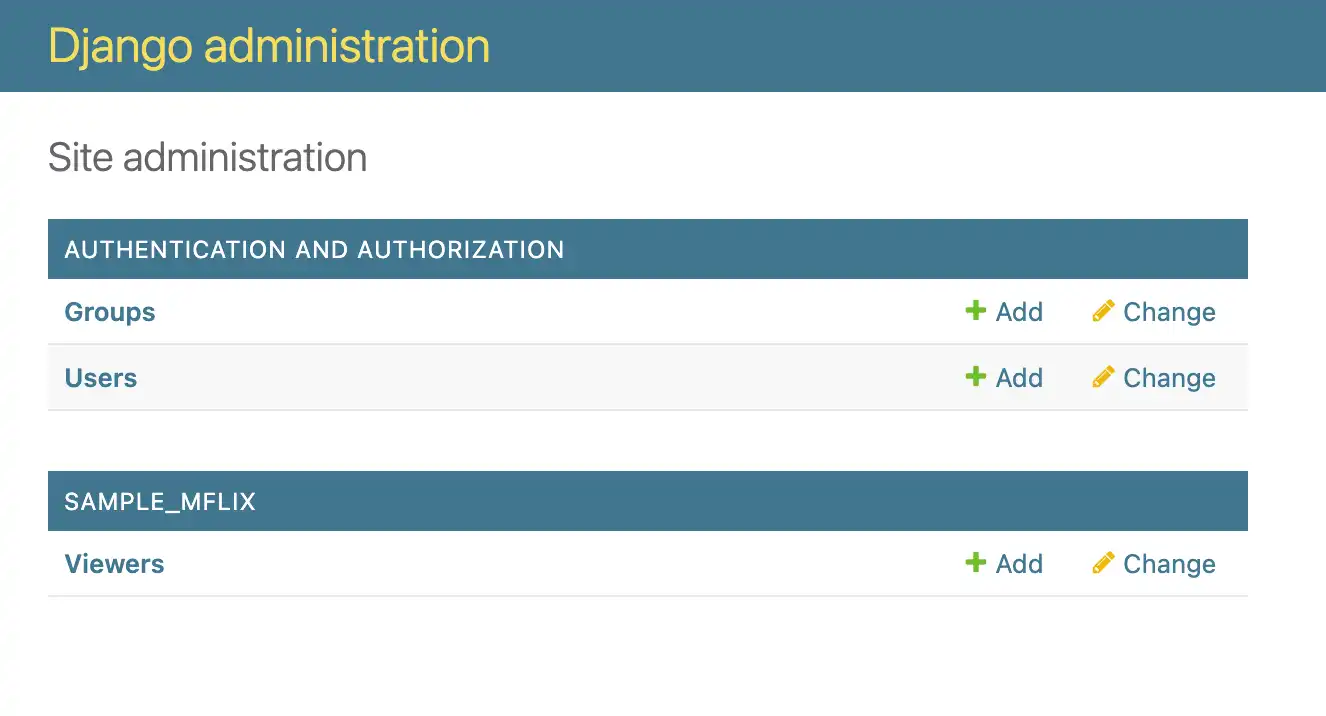
Access your sample_mflix app from the admin site.
After logging in to the admin site, you can see the following information:

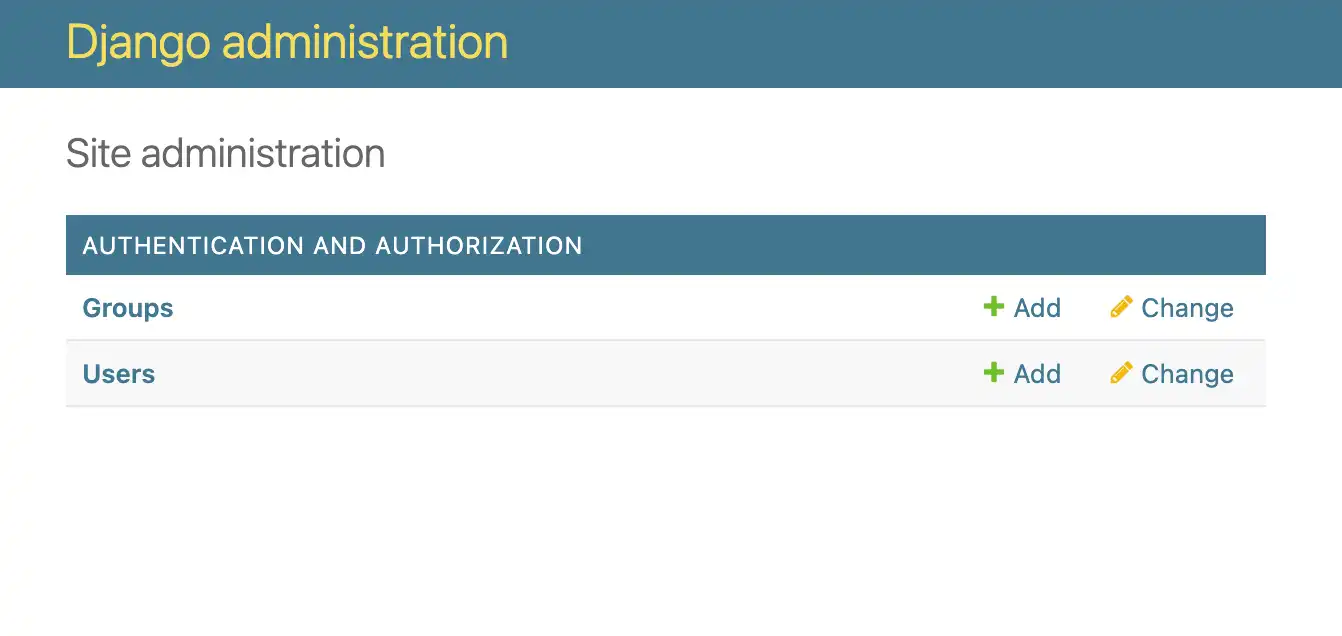
You can edit your project's authentication configuration by selecting the Groups or Users row in the Authentication and Authorization table.
To edit the data in the users sample collection, represented by your
Viewer model, navigate to your project's sample_mflix/admin.py file
and paste the following code:
from django.contrib import admin from .models import Viewer admin.site.register(Viewer)
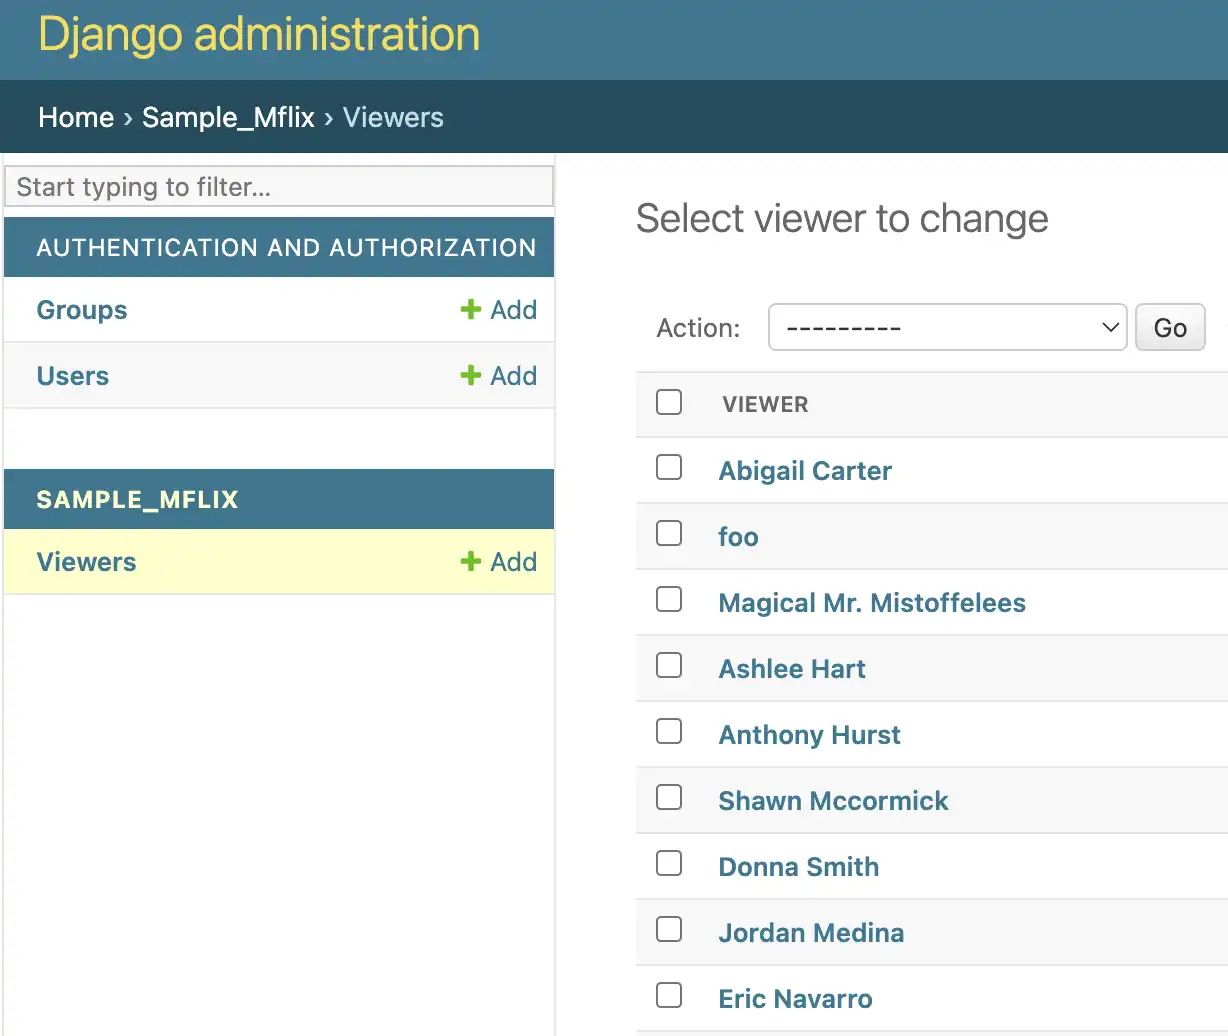
Now, your admin site displays the following information:

Select a Viewer object.
You can view the data stored in a Viewer object that
has a name value of "Abigail Carter". You created
this object in the Write Data to MongoDB step
of this tutorial.
Click on the Viewers row of the SAMPLE_MFLIX table to see a list of viewers. The admin site displays the following list:

Then, click on Abigail Carter at the top of the list. The site displays the Name and Email of the selected viewer:

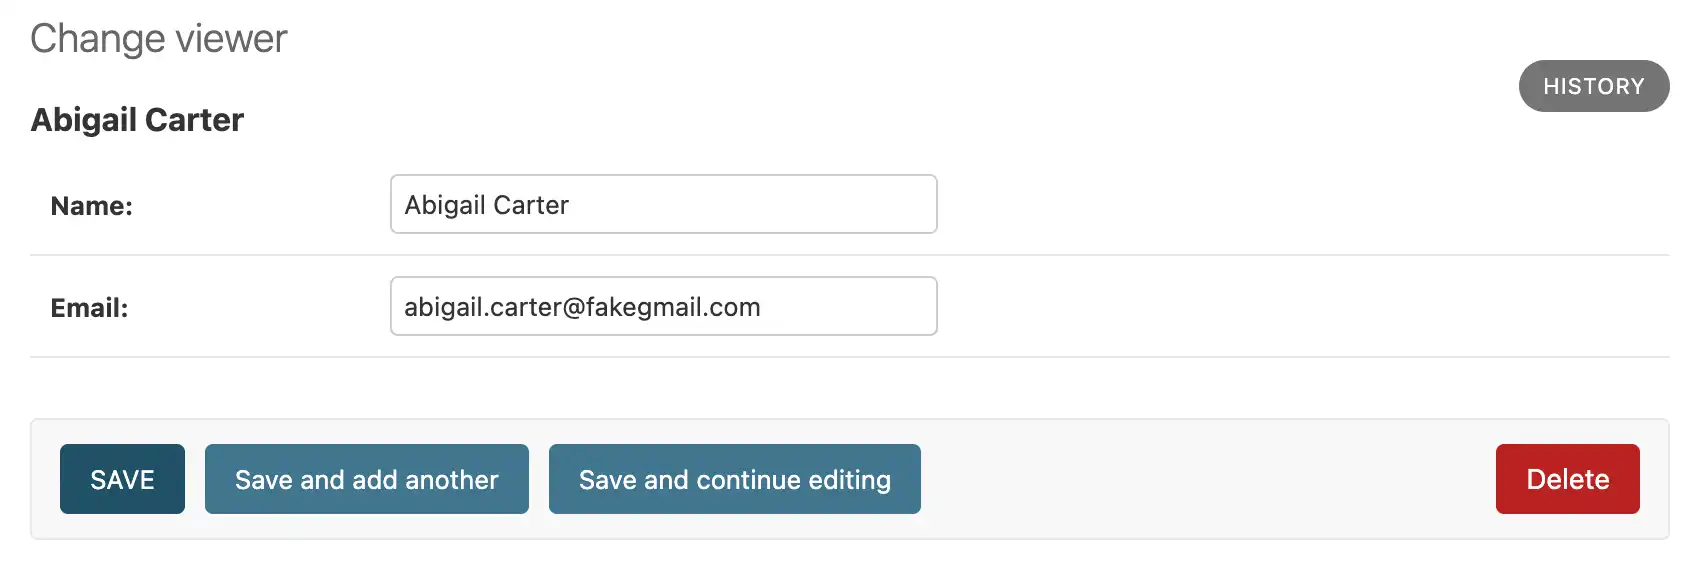
Edit the data in a Viewer object.
To edit the email field of the viewer, select the
box that contains the text "abigail.carter@fakegmail.com".
Delete this text and replace it with "acarter1@fakegmail.com",
as shown in the following image:

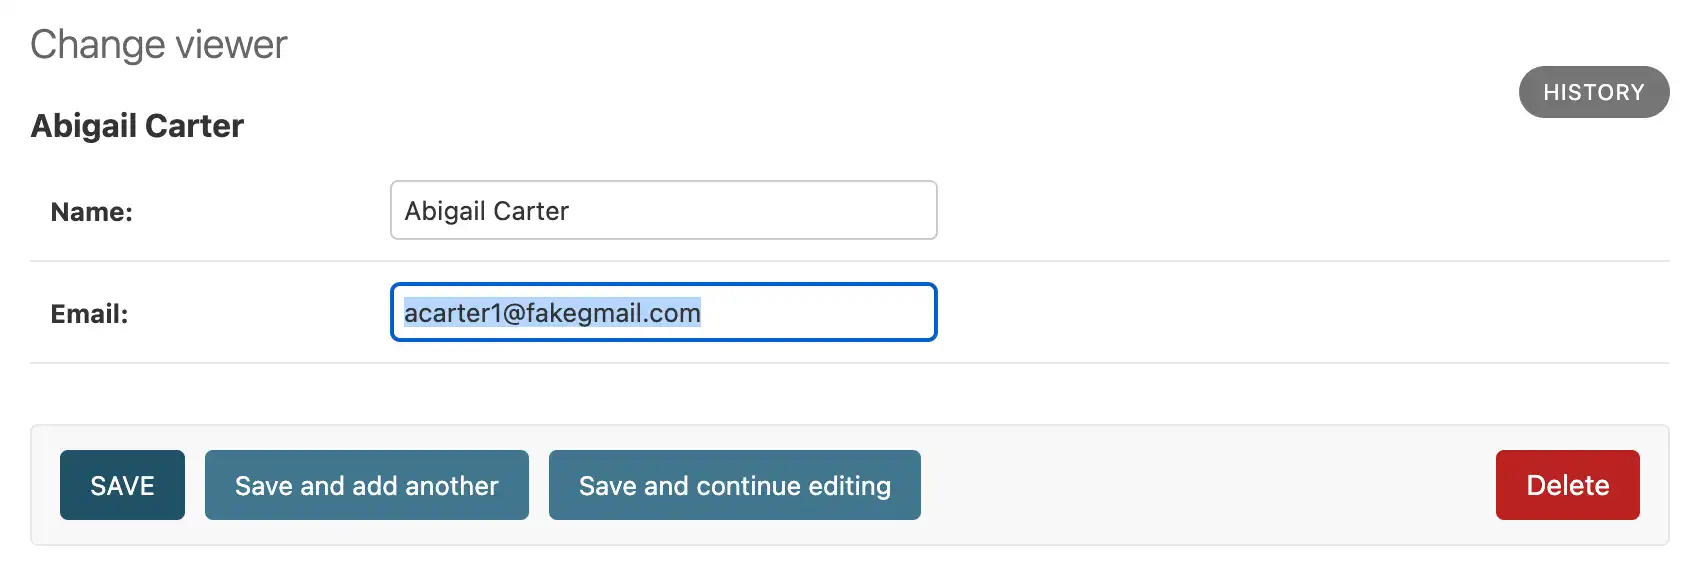
Then, click the SAVE button below the viewer's information to save your changes.
Next Steps
Congratulations on completing the Django MongoDB Backend tutorial!
In this tutorial, you created a Django application that connects to a MongoDB deployment hosted on MongoDB Atlas and interacts with data.
Learn more about Django MongoDB Backend from the following resources:
django-mongodb-backend source code
Django MongoDB Backend API documentation