Overview
In this guide, you can learn how to create a full-stack Meteor application that uses Vue as the front-end framework. Meteor is a JavaScript framework for creating web and mobile applications. This framework supports a range of front-end libraries for building the user interface, including Vue.
The application in this tutorial consists of the following layers:
Database layer: MongoDB provides data storage and retrieval
Application layer: Meteor handles both client and server-side logic with integrated build tools
Presentation layer: Vue implements the user interface with reactive data binding
Why Use MongoDB with Meteor and Vue?
Meteor is built on MongoDB's document model, and Meteor applications configure MongoDB by default. You can quickly create a full-stack application that stores data in MongoDB with minimal dependency installations or boilerplate code.
MongoDB's flexible document structure naturally aligns with JavaScript objects. As a result, you can work seamlessly with MongoDB data in your Vue components. When you use Meteor to query MongoDB, the documents you receive can be directly used in your Vue templates without complex data transformation.
Additionally, Meteor provides built-in real-time data synchronization that automatically updates your Vue components when data changes in MongoDB. When one user modifies data, all connected users see the changes instantly in their Vue interfaces without a manual refresh or polling. By using MongoDB with Meteor and Vue, you can leverage Meteor's real-time data synchronization capabilities alongside Vue's reactive component system.
Quick Start Tutorial
This tutorial shows you how to build a web application by using Meteor and Vue. The application accesses sample restaurant data, queries the data, and displays the results on a locally hosted site. The tutorial also includes instructions on connecting to a MongoDB cluster hosted on MongoDB Atlas and accessing and displaying data from your database.
Tip
If you prefer to connect to MongoDB by using the Node.js driver without Meteor, see the Get Started with the Node.js Driver guide.
Set Up Your Project
Follow the steps in this section to install the project dependencies, create an Atlas cluster, and set up the application directories.
Verify the prerequisites
To create the Quick Start application, install the following software in your development environment:
Prerequisite | Notes |
|---|---|
Use version 20 or later. | |
Code editor | This tutorial uses Visual Studio Code, but you can use the editor of your choice. |
Terminal app and shell | For MacOS users, use Terminal or a similar app. For Windows users, use PowerShell. |
Create a MongoDB Atlas cluster
MongoDB Atlas is a fully managed cloud database service that hosts your
MongoDB deployments. If you do not have a MongoDB deployment, you can create a MongoDB
cluster for free (no credit card required) by completing the
MongoDB Get Started
tutorial. The MongoDB Get Started tutorial also demonstrates how to load sample
datasets into your cluster, including the sample_restaurants database
that is used in this tutorial.
To connect to your MongoDB cluster, you must use a connection URI. To learn how to retrieve your connection URI, see the Add your connection string section of the MongoDB Get Started tutorial.
Tip
Save your connection string in a secure location.
Install Meteor
Install Meteor by running the following command in your terminal:
npx meteor
If you encounter any issues, refer to the Meteor installation guide.
Install the MongoDB Node.js Driver
Install the Node.js driver by running the following command in your terminal:
npm install mongodb
To learn more about installing the driver, see the Get Started with the Node.js Driver guide.
Clean up the project structure
Before adding application code, remove the unnecessary template files
by running the following commands from your meteor-vue-quickstart directory:
cd imports/ui rm components/AppMenu.vue components/Hello.vue components/Info.vue views/About.vue views/Home.vue
This removes the default template components that the restaurant application does not use.
Configure Your MongoDB Connection
After setting up the project structure, follow the steps in this section to connect your Meteor application to MongoDB.
Provide your connection URI
Retrieve the connection URI that you saved in a previous step.
To access the sample_restaurants database, modify your connection URI to include
the database name. Use the following format to update your URI:
mongodb+srv://<username>:<password>@<cluster>/sample_restaurants?<options>
Then, set the MONGO_URL environment variable to this modified connection URI
by running the following command from the meteor-vue-quickstart directory:
export MONGO_URL="<connection URI>"
Replace the <connection URI> placeholder with your connection URI.
Access the restaurants collection
In the imports/api directory, create a file named restaurantsCollection.js
and paste the following code:
import { Mongo } from 'meteor/mongo'; export const RestaurantsCollection = new Mongo.Collection('restaurants');
This file accesses and exports the sample_restaurants.restaurants collection.
Set up data publications
Create a file named restaurantsPublications.js in the imports/api directory
and paste the following code:
import { Meteor } from 'meteor/meteor'; import { RestaurantsCollection } from './restaurantsCollection'; // Publishes all restaurants Meteor.publish('restaurants', function publishRestaurants() { console.log('Publishing all restaurants...'); const cursor = RestaurantsCollection.find({}, { limit: 200 }); // Limit for performance console.log('Publication cursor created for all restaurants'); return cursor; }); // Publishes restaurants that match the "borough" and "name" filters Meteor.publish('restaurants.filtered', function publishFilteredRestaurants() { console.log('Publishing filtered restaurants...'); const query = { borough: 'Queens', name: { $regex: 'Moon', $options: 'i' } }; const cursor = RestaurantsCollection.find(query); console.log('Publication cursor created for filtered restaurants'); return cursor; });
This file defines Meteor publications that allow the client to subscribe to restaurant data. It includes the following publications:
restaurants: Publishes all restaurants, but limits them to200to avoid performance issuesrestaurants.filtered: Publishes restaurants in Queens that have"Moon"in the name. The$optionsargument specifies that this regex string matching is case-insensitive.
Define an insert operation
Create a new directory named scripts, and then create a file
in this directory called insertDemo.js. Paste the following code
into insertDemo.js:
const { MongoClient } = require('mongodb'); const MONGO_URL = process.env.MONGO_URL; async function insertSampleRestaurant() { const client = new MongoClient(MONGO_URL); try { await client.connect(); const db = client.db(); const collection = db.collection('restaurants'); const doc = { name: "Honey Moon Coffee Shop", borough: "Queens", cuisine: "Café/Coffee/Tea", }; const result = await collection.insertOne(doc); console.log('Inserted restaurant with ID:', result.insertedId); } catch (error) { console.error('Error:', error); } finally { await client.close(); } } insertSampleRestaurant();
This file defines a method named insertSampleRestaurant(), which inserts
a document that stores the following fields:
name:"Honey Moon Coffee Shop"borough:"Queens"cuisine:"Café/Coffee/Tea"
You will use this file to demonstrate Meteor's real-time data synchronization capabilities in a future step.
Update the server configuration
Replace the contents of server/main.js with the following code:
import { Meteor } from 'meteor/meteor'; import { RestaurantsCollection } from '../imports/api/restaurantsCollection'; import '../imports/api/restaurantsPublications'; Meteor.startup(async () => { // Check connection to restaurants collection try { const restaurantCount = await RestaurantsCollection.find().countAsync(); console.log(`Connected to MongoDB Atlas. Found ${restaurantCount} restaurants in the collection`); } catch (error) { console.error('Error connecting to restaurants collection:', error); } });
This file imports the necessary collections and publications. It also creates
a startup function that verifies the MongoDB connection by printing the
number of documents in the restaurants collection.
Configure Vue Components
After setting up the data layer, follow the steps in this section to create Vue components that display the restaurant data.
Set up routing
Navigate to the imports/ui/router.js file and paste the following code:
import { createRouter, createWebHistory } from 'vue-router'; import RestaurantList from './views/RestaurantList.vue'; export const router = createRouter({ history: createWebHistory(), routes: [ { path: '/', name: 'home', component: RestaurantList, meta: { filter: false } }, { path: '/browse', name: 'browse', component: RestaurantList, meta: { filter: true } } ], });
This file configures the Vue routes and determines what content to render
for each one. The / route displays all restaurant data, and the /browse route
displays filtered restaurant data.
Create the Restaurant component
In the imports/ui/components directory, create a file named Restaurant.vue
that contains the following code:
<script setup> defineProps({ restaurant: { type: Object, required: true, }, }); </script> <template> <tr class="border-b transition-colors hover:bg-gray-50"> <td class="p-4 align-middle">{{ restaurant.name }}</td> <td class="p-4 align-middle">{{ restaurant.borough }}</td> <td class="p-4 align-middle">{{ restaurant.cuisine }}</td> </tr> </template>
This component displays individual restaurant information as a row in a table.
Create the RestaurantList view
In the imports/ui/views directory, create a file named RestaurantList.vue
that contains the following code:
<script setup> import Restaurant from '../components/Restaurant.vue'; import { subscribe, autorun } from 'vue-meteor-tracker'; import { RestaurantsCollection } from '../../api/restaurantsCollection'; import { useRoute, RouterLink } from 'vue-router'; import { computed } from 'vue'; const route = useRoute(); // Determines whether to show filtered results const isFiltered = computed(() => route.path === '/browse'); // Subscribes to both publications to avoid switching issues subscribe('restaurants'); subscribe('restaurants.filtered'); // Retrieves restaurants based on current route with client-side filtering as backup const restaurants = autorun(() => { let docs; if (isFiltered.value) { docs = RestaurantsCollection.find({ borough: 'Queens', name: { $regex: 'Moon', $options: 'i' } }).fetch(); console.log('Filtered restaurants found:', docs.length); } else { docs = RestaurantsCollection.find({}, { limit: 200 }).fetch(); console.log('All restaurants found:', docs.length); } return docs; }).result; // Determines the title based on the route const getTitle = computed(() => { return isFiltered.value ? 'Filtered Restaurants (Queens, containing "Moon")' : 'All Restaurants'; }); </script> <template> <div class="container mx-auto px-4"> <!-- Navigation --> <nav class="flex justify-between items-center mb-6 p-4 bg-white shadow rounded"> <div class="flex space-x-4"> <RouterLink to="/" class="px-4 py-2 text-blue-600 hover:bg-blue-50 rounded transition-colors" :class="{ 'bg-blue-100 font-semibold': !isFiltered }" > All Restaurants </RouterLink> <RouterLink to="/browse" class="px-4 py-2 text-blue-600 hover:bg-blue-50 rounded transition-colors" :class="{ 'bg-blue-100 font-semibold': isFiltered }" > Browse Filtered </RouterLink> </div> </nav> <!-- Header --> <header class="mb-6"> <h1 class="text-4xl font-bold text-gray-800 my-4">Restaurant Directory</h1> <h3 class="text-lg font-semibold text-gray-600">{{ getTitle }}</h3> </header> <!-- Restaurant Table --> <div class="border rounded-lg overflow-hidden shadow"> <div class="relative w-full overflow-auto"> <table class="w-full text-sm"> <thead class="bg-gray-100 border-b-2 border-gray-300"> <tr class="border-b-2 border-gray-400"> <th class="h-14 px-4 text-left align-middle font-bold text-gray-900 text-base tracking-wide"> Name </th> <th class="h-14 px-4 text-left align-middle font-bold text-gray-900 text-base tracking-wide"> Borough </th> <th class="h-14 px-4 text-left align-middle font-bold text-gray-900 text-base tracking-wide"> Cuisine </th> </tr> </thead> <tbody> <Restaurant v-for="restaurant in restaurants" :key="restaurant._id" :restaurant="restaurant" /> </tbody> </table> <!-- Empty state --> <div v-if="restaurants.length === 0" class="p-8 text-center text-gray-500"> <p>No restaurants found. Ensure that your connection URI is correct and includes the sample_restaurants database name.</p> <p v-if="isFiltered" class="text-sm mt-2"> Try the "All Restaurants" tab to see all available restaurants. </p> </div> </div> </div> <!-- Restaurant count --> <div class="mt-4 text-sm text-gray-600"> Showing {{ restaurants.length }} restaurant{{ restaurants.length !== 1 ? 's' : '' }} </div> </div> </template>
This component handles the restaurant list display and automatically switches between showing all restaurants or filtered results based on the current route.
Update the main App component
Replace the contents of imports/ui/App.vue with the following code:
<script setup> import { RouterView } from 'vue-router'; </script> <template> <div class="min-h-screen bg-gray-50"> <RouterView /> </div> </template>
This is the main application component that includes navigation and renders the appropriate child components based on the current route.
Run Your Application
Finally, follow the steps in this section to run your application and view the rendered restaurant data.
Start the Meteor application
Navigate to your project directory and run the following command from your terminal:
meteor npm run start
If successful, the command output resembles the following example:
[[[[[ ~/meteor-vue-quickstart ]]]]] => Started proxy. => Started HMR server. ... Connected to MongoDB Atlas. Found 25368 restaurants in the collection => Started your app. => App running at: http://localhost:3000/
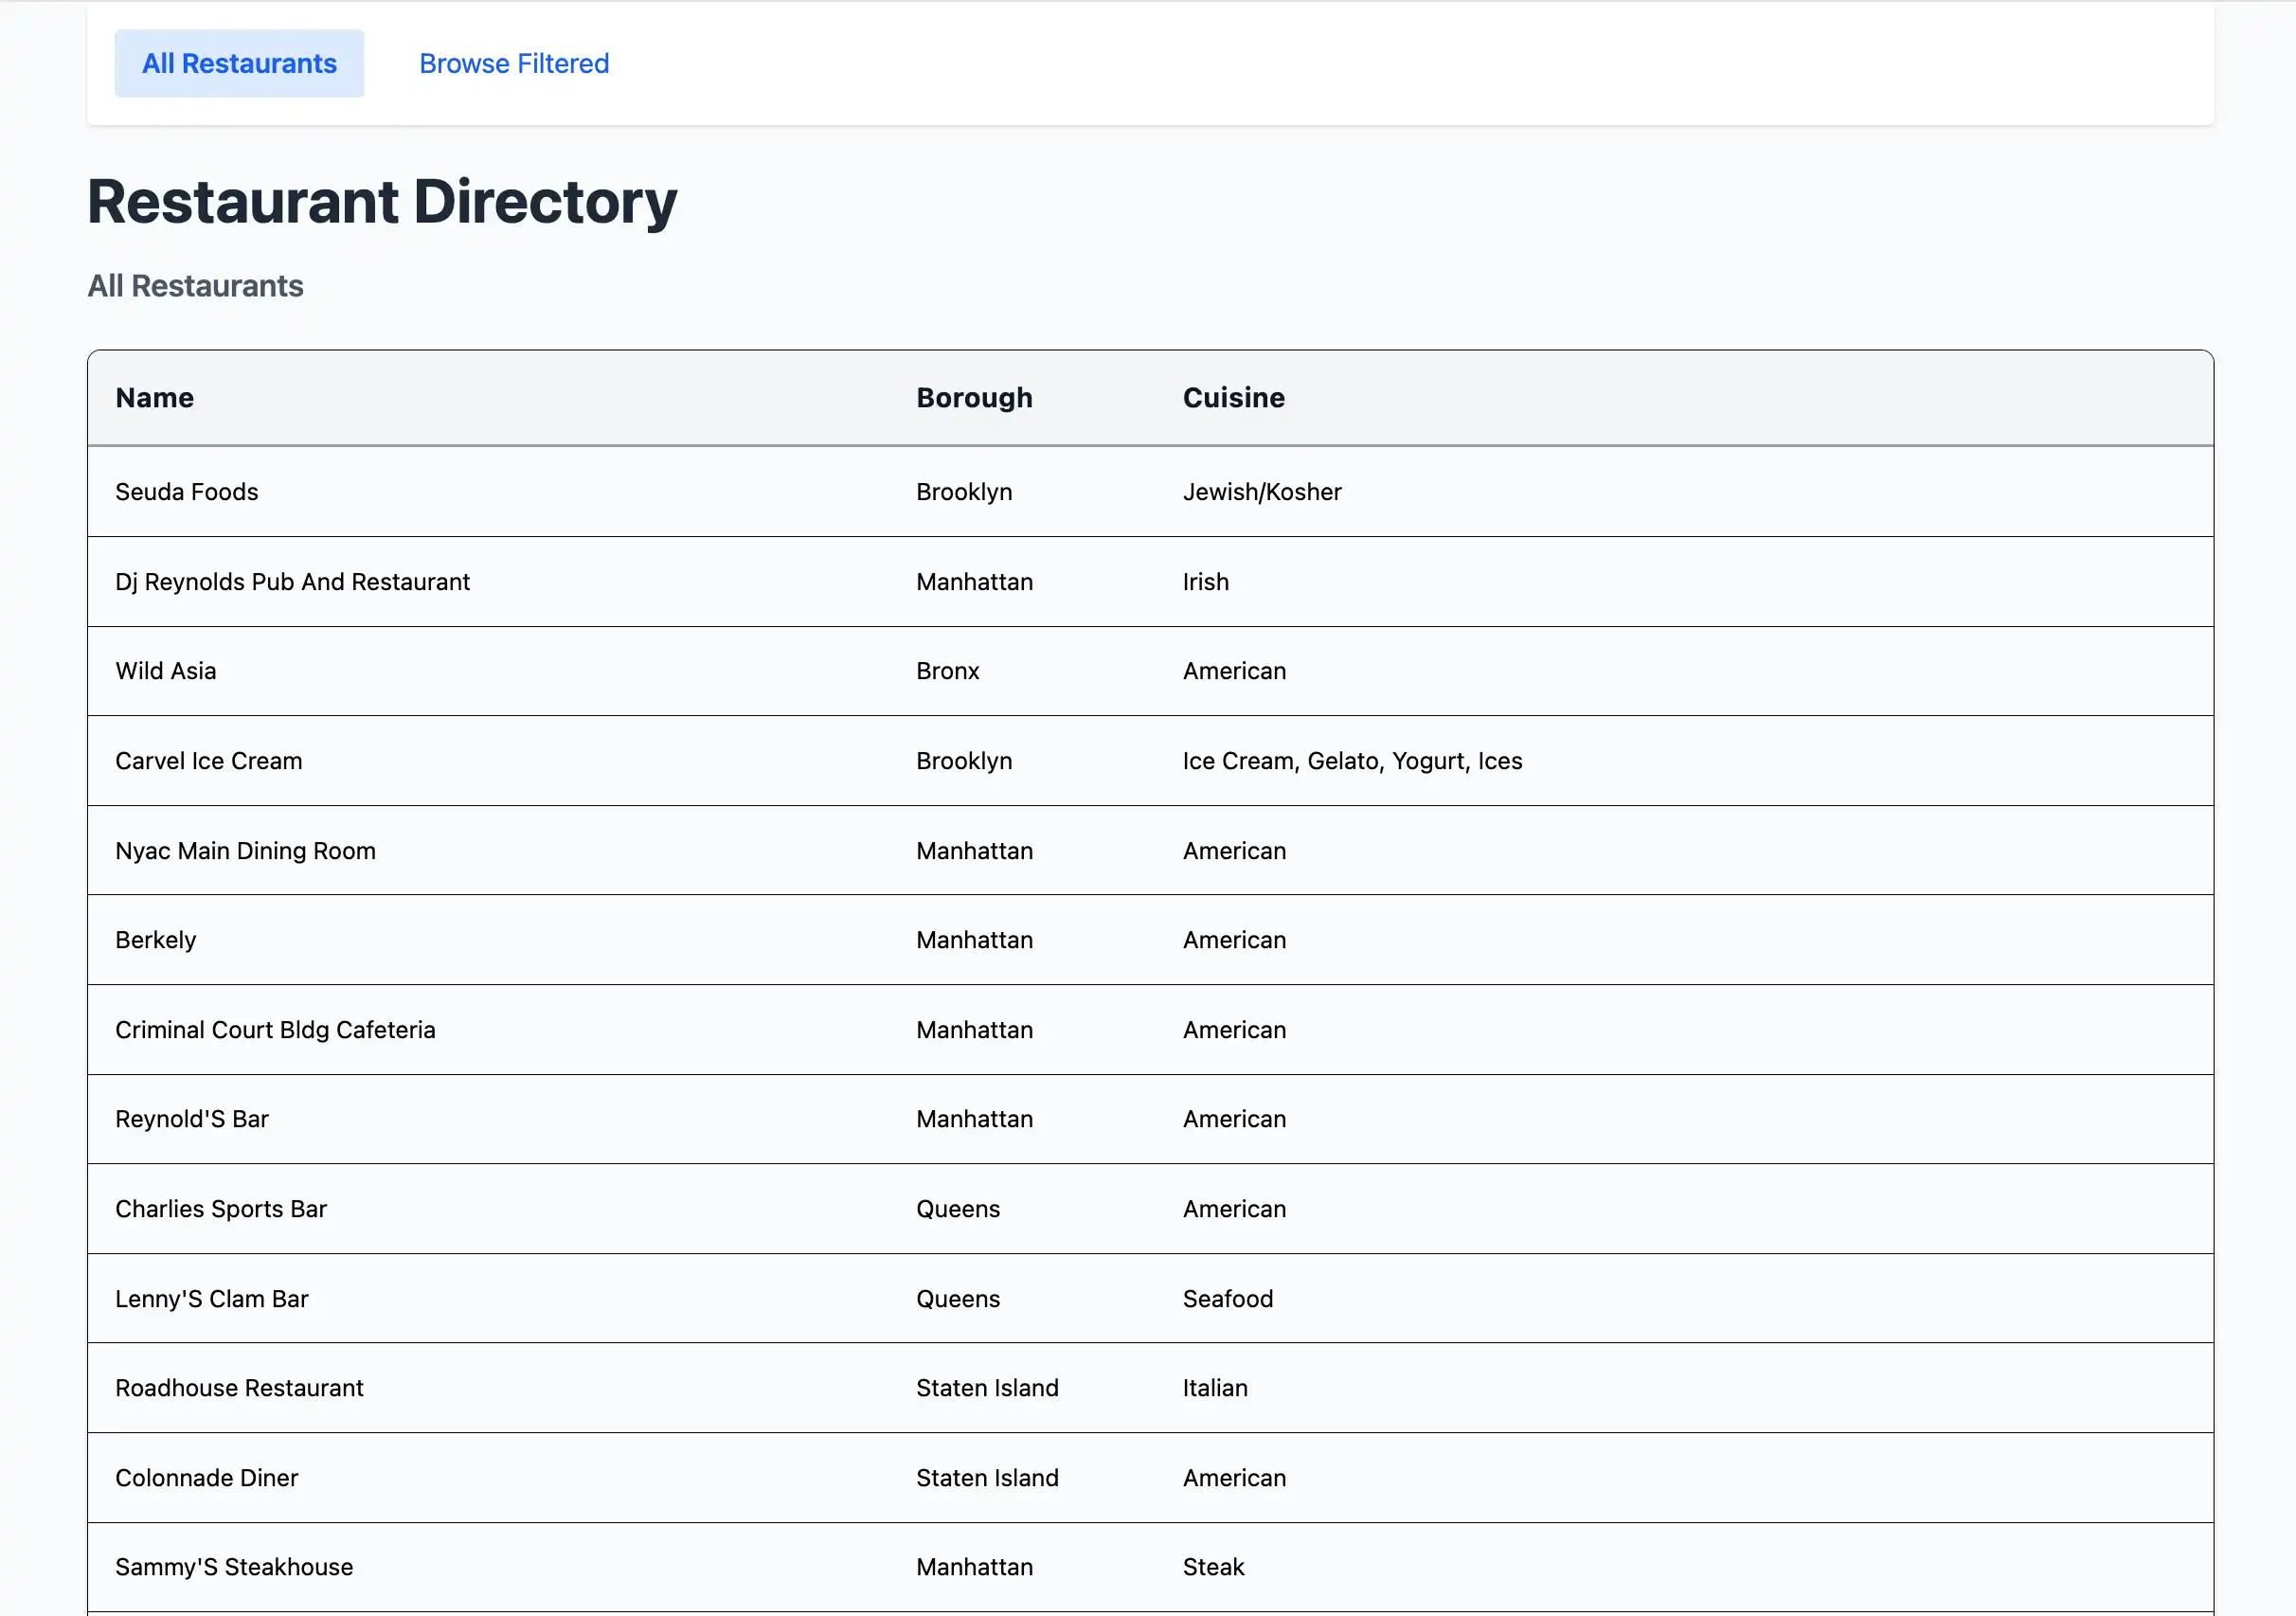
Open the application in your browser
Open http://localhost:3000/ in your web browser. The initial
landing page displays a list of 200 unfiltered restaurants in the sample_restaurants.restaurants
collection:

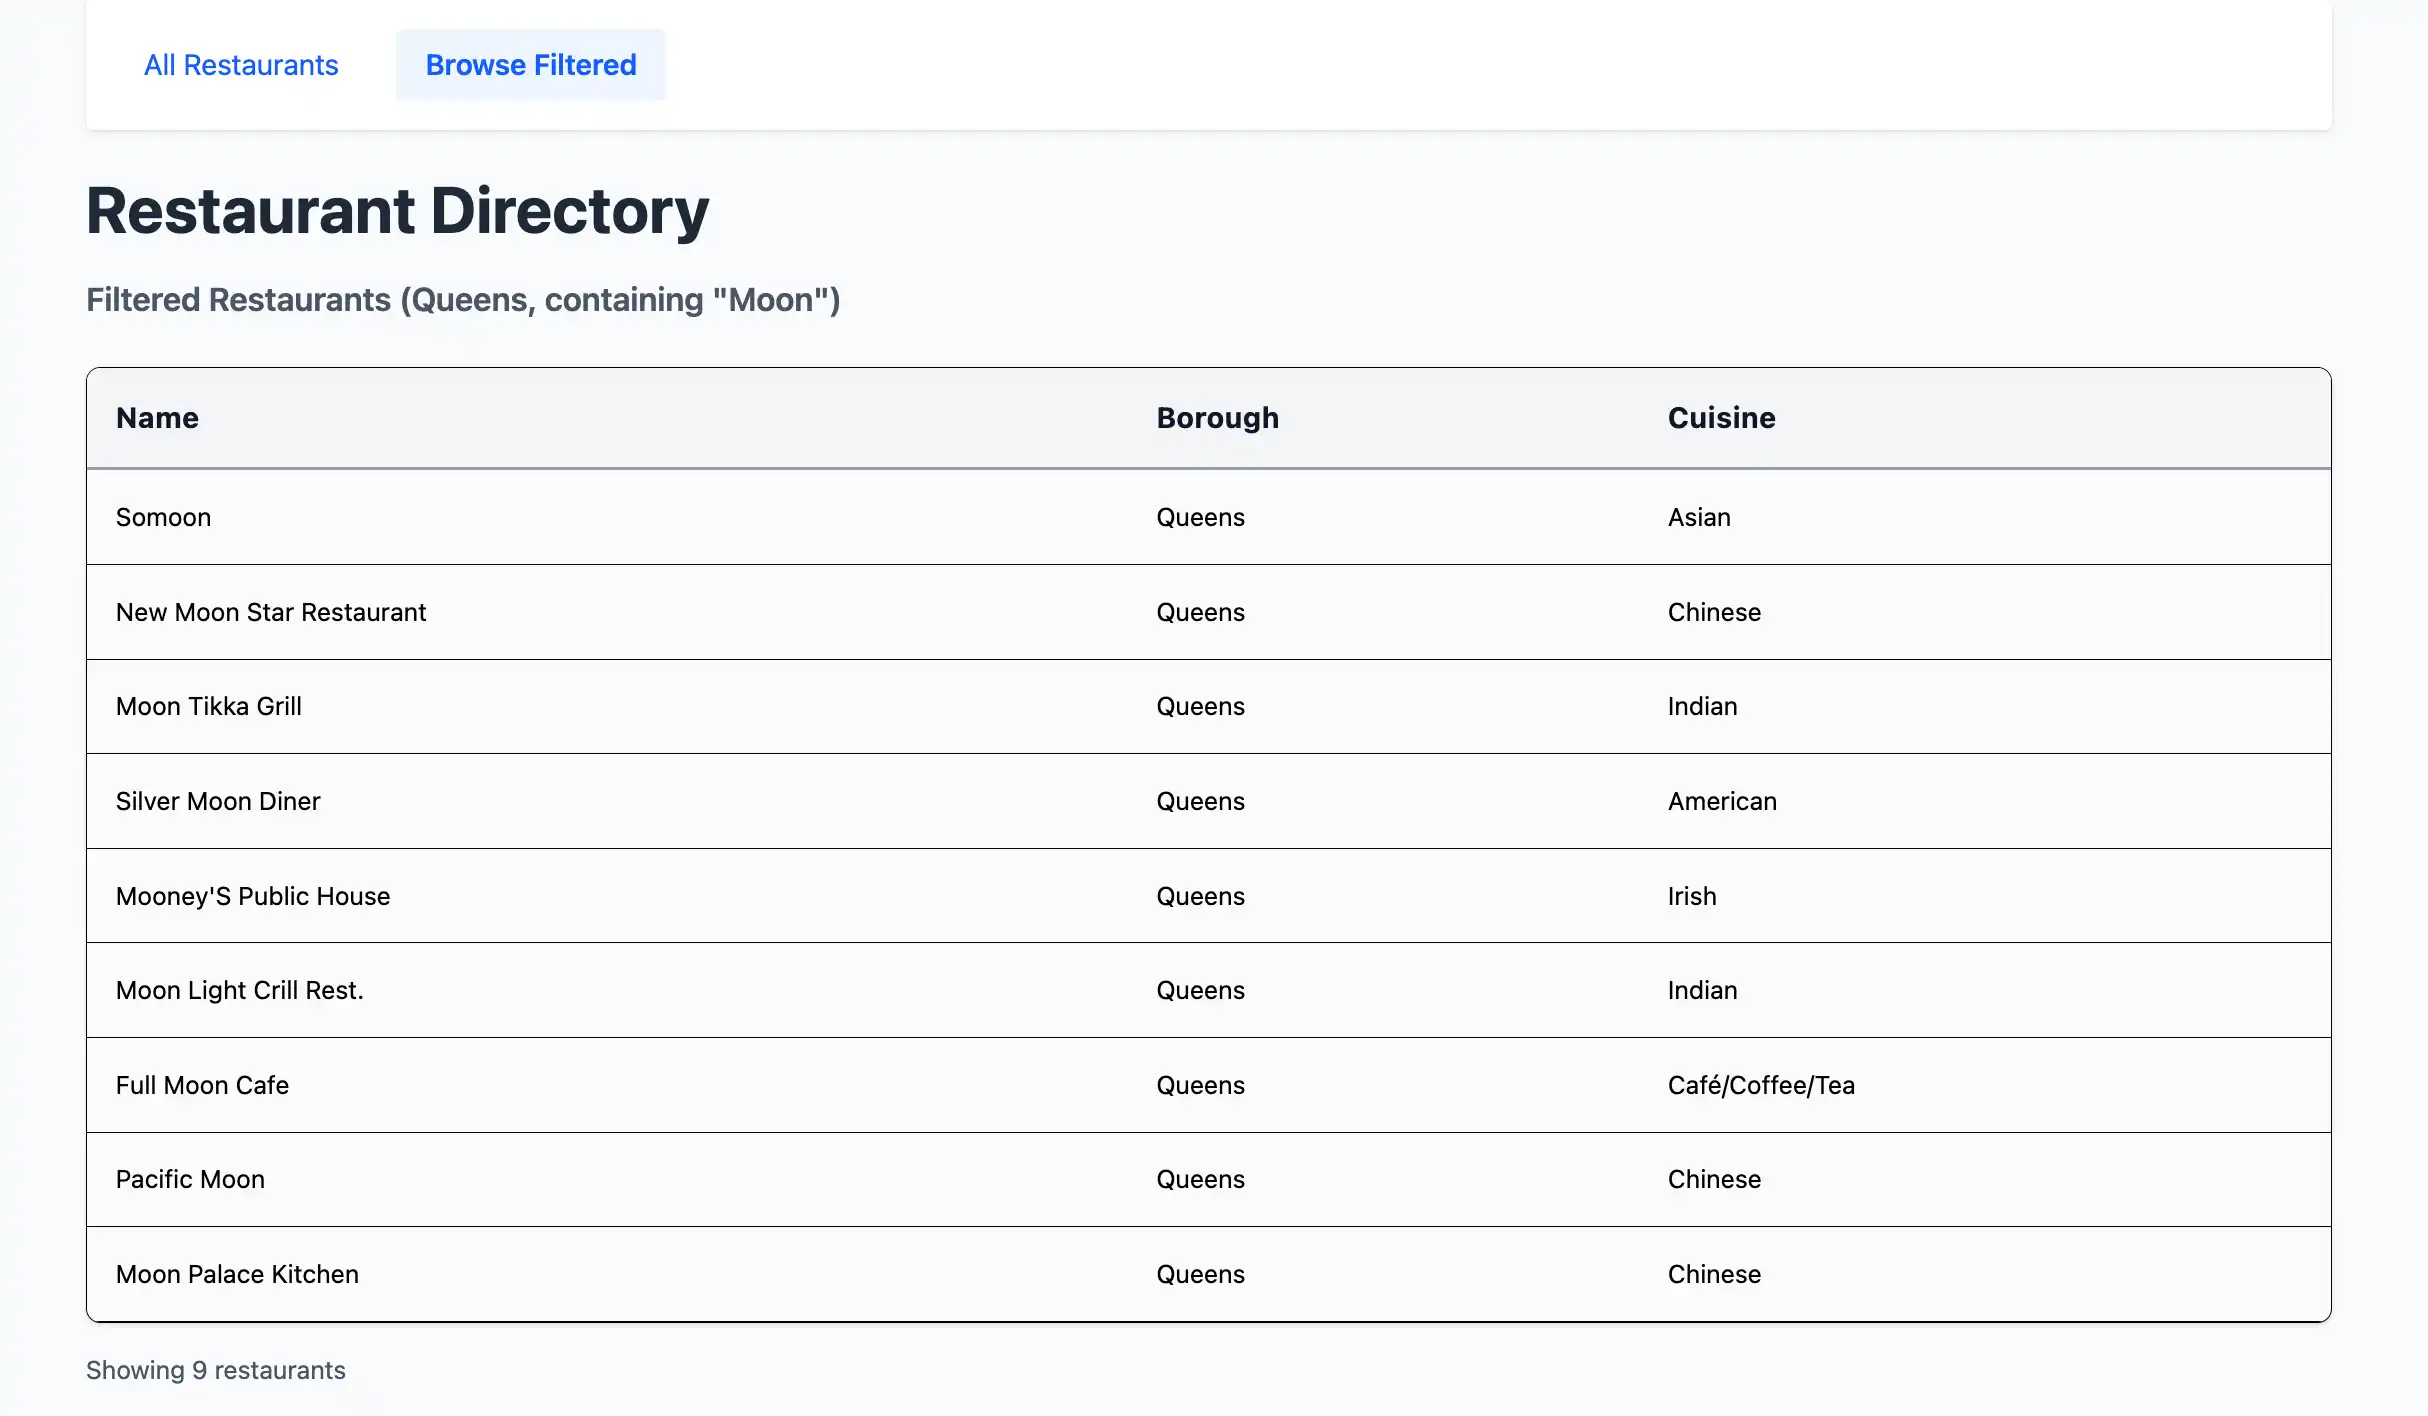
At the top of the page, click the Browse Filtered button
to view restaurants in Queens that have "Moon" in their name:

View real-time data changes
You can explore Meteor's real-time data synchronization features by inserting a sample document and viewing the changes in your application's front end.
Open a second terminal window and navigate to your project directory. Export your MongoDB connection URI by running the same command as shown in a previous step:
export MONGO_URL="<connection URI>"
Then, run the following command to insert a sample document that has a name value of
"Honey Moon Coffee Shop":
node scripts/insertDemo.js
You can see the new document in the Filtered Restaurants table at the http://localhost:3000/browse URL.
Congratulations on completing the Quick Start tutorial!
After you complete these steps, you have a Meteor and Vue web application that connects to your MongoDB deployment, runs queries on sample restaurant data, and renders the results with real-time reactivity.
Additional Resources
To learn more about Meteor, Vue, and MongoDB, view the following resources:
Meteor documentation
Vue 3 documentation
vue-meteor-tracker package
Node.js driver documentation